 |
| ‘Hannah’s Choice’ melons. Adam Tomash photo. |
 |
| Half-gallon milk cartons with their tops and bottoms removed make good containers for starting melons, tomatoes and other transplants. A flap at the top of the carton can be cut, folded down and used as a label. Adam Tomash photo. |
 |
| When plants are ready to be transplanted to the garden, slice the corners of the carton down to about an inch from the bottom. Adam Tomash photo. |
 |
| Stand the carton upright and squeeze all four sides to release roots that may adhere to the sides. Then lift the carton gently, supporting the soil block with one hand, and slide it into the hole. Adam Tomash photo. |
 |
| Fold the box sides down and let the vines grow out over them. Adam Tomash photo. |
By Adam Tomash
This article describes techniques used to grow good tasting cantaloupes (also called muskmelons; Cucumis melo) and watermelons (Citrullus lanatus). These general techniques also work well for all free-running (non-trellised) cucurbits. Areas requiring special attention are heat, fertility, water, insect control and weed suppression.
Before I moved to Maine, I gardened in Rhode Island, where it was easy to grow melons that tasted like melons are supposed to taste. I moved to Maine in 1972 and gardened at the 45th parallel, where we often had only one or two frost-free months. My first attempts in this unforgiving climate yielded off-taste melons lacking sweetness. I finally devised a method that worked for small quantities of melons. Each hill was covered with a 5- by 5-foot by 4-foot-high miniature greenhouse made from wood and, for the roof and gable end panels, flat fiberglass sheeting. We started melons in hills in late May or early June and covered them with the greenhouse. When the vines began to climb the sides, we placed blocks under each corner of the greenhouse so that the vines could sneak out. Most of the melons set near the hill, were happy in the enclosed microclimate, and tasted good. But I wanted more melons, so I developed the following technique. It is labor intensive but can produce many more melons than my little greenhouses and is low-cost and scalable.
Varieties
In the last 10 years, I’ve grown over 18 varieties of cantaloupes and watermelons; the number from 40 years of Maine gardening is probably twice that. The most important factor is days to maturity. As melons try to mature, they need stable, somewhat warm weather. Melons do not tolerate Maine’s frequently cold fall nights, so choose varieties that mature in 70 to 87 days – preferably the shorter season varieties if you have a cold location or want to play it safe.
The two C. melo varieties I favor are ‘Maverick’ (Johnny’s #2691, 75 days, Internet only in 2012) and ‘Hannah’s Choice’ (Fedco 1049HC, 87 days). They reliably produce large, tasty melons with a high percentage of marketable fruit. Gauging when they are ripe is also easy. My favorite C. lanatus variety is ‘Blacktail Mountain,’ which stores for well over a month in an unheated garage (Fedco 953BM, 71 days). Many prefer ‘Quetzali’ (Fedco 980QZ, 85 days).
Starting Seeds
Garden soil is not reliably warm enough most years to sow seeds directly in early June, so start seeds around June 1 in pots in a warm greenhouse, coldframe, or on a heat mat inside. This ensures warm soil and stable temperatures for transplanting three to four weeks later.
Melons are fussy about being transplanted. To avoid transplant shock, many people use large peat pots. I prefer half-gallon paper milk cartons accumulated over winter.
Remove the top and bottom of the carton. Fill the cartons with quality potting soil and place them in a tray with drain holes. If the cartons don’t fit exactly, fill the remaining space with extra soil, bubble wrap or wooden blocks. Sow five to seven seeds per carton. Thin these to the best four after germination, pulling the weakest plants when young so that remaining plants are not unduly disturbed. You can cut two corners of the carton down about an inch, fold the resulting tab down and use a nursery marker to label that tab with the variety. This label will stay with those plants until fall, so use a UV resistant marker.
Place this tray in a warm spot. The ideal soil temperature for germination is about 80 F. A heat mat works well, but after germination get the plants into full sun. We use a temporary plastic tunnel over an active compost pile that provides all the heat and light seedlings need. This tunnel is detailed at /Publications/The-Maine-Organic-Farmer-Gardener/Winter-2007-2008/Grow-Heat-Loving-Plants.
Check root growth frequently after the second week. When roots begin to poke out the bottom, spread the cartons out on a board so that roots don’t grow into adjacent cartons but instead air prune themselves.
Fertilization
Melons require a lot of nutrients, a pH of about 7 and big swaths of garden space. They are commonly planted in hills, with most of the added nutrients in a hole right under the plants. It helps to have the hill surrounded by garden soil of above average fertility. The following methods are more easily accomplished when rows are as long as a roll of mulch plastic (about 50 feet). Hills should be 2 to 3 feet apart (1 foot if only one plant is grown in each hill) in rows at least 5 to 6 feet apart. Keep melons well away from other vigorous vine crops, such as cucumbers.
Run a garden marker line the length of the row and dig holes the size of bushel baskets in a straight line at the edge of the line and at the recommended spacing, placing the soil around the perimeter of the hole. With four plants per hill, the recommended spacing between hills is at least 3 feet, but you can increase that to 5 or 6 feet to minimize overcrowding. Next, with a 5-gallon bucket of good aged compost and 1 or 2 quarts of mineral mix (described below), mix the compost and mineral mix a little at a time with the soil and back fill the mix into the hole. You should end up with a small mound (hill) for the transplants. Do this at least a week before transplanting, because the mineral mix sometimes heats the soil too much at first for tender melon roots.
I make a mineral mix by combining the materials below, available from Fedco’s Organic Growers Supply (OGS). Mixed with compost, this blend gives plants a bountiful reservoir of nutrients and allows them to achieve their full potential.
1 part aragonite
1/2 part Azomite
1 part greensand
1 part Menefee Humate
1 part sul-po-mag (K-Mag)
1 part Cockadoodle Doo
1 part Fertrell (3-2-3)
1 part kelp meal
2 parts soybean meal
2 parts alfalfa meal
I don’t add any phosphorus supplements because my soil is already quite high in that nutrient. Alter this recipe to reflect your soil test results.
Transplanting
When plants have filled their containers with roots and hold the soil in a solid mass, it is time to transplant – about the third week in June. You can plant sooner, but I don’t think you gain much, and you have a lot to lose if the weather turns cool. Sometimes plants attract cucumber beetles at this stage; be sure to rid plants of them before transplanting. If you see leaf damage, you have beetles. They sometimes hide in the potting soil but can be flushed out by flooding pots with water. Do this a day before planting, then cover plants with a scrap of Reemay to avoid reinfestation. The plants will be living under Reemay or Typar for a few weeks after transplanting, and beetles won’t be able to get to them unless you inadvertently bring them in with the transplants. Young melon plants don’t like the abrasion caused by contact with Reemay, so try to minimize it.
The next step requires a trowel and a box cutter with a new razor. Dig a hole in each prepared hill that is deep enough so that the soil level of the hill will match the soil level in the carton when the plant is placed in the hole. Wear gloves for the next step. Lay each carton on its side on a clean wooden surface, such as a plant flat or piece of plywood. Be careful; plants are delicate at this point. Slice each corner of the carton with the box cutter from the top down to about an inch above the bottom. Then stand the carton upright and squeeze all four sides to release roots that may adhere to the sides. Lift the carton gently, supporting the soil block with one hand, and slide it into the hole. Check that the soil levels will match. Then with a quick upward motion, pull the carton up until the bottom of the slits lines up with the soil level inside the carton. You can do this all in one motion or an inch at a time, backfilling as you go. The latter method is preferable. The carton will stay with the plant with the bottom inch of the carton being buried in the soil. You may fold the sides down to help keep the vines from dragging in the soil, or leave them up. Orient label tabs of the cartons in the same direction to ease identification when the labels are overgrown with vines. At least you know which side to look at.
Give each plant a good soaking or two. The potting soil I use dries out fast until roots grow into the surrounding ground, so plants are vulnerable to drying out in the first seven to 10 days. Check them every day during that period.
 |
| A melon patch. Adam Tomash photo. |
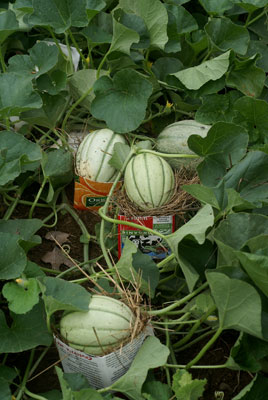 |
| Place melons on bricks or on open-ended milk cartons to keep them away from mice and to help them ripen in the sun. Adam Tomash photo. |
Cultural Techniques
You will need 4-foot-wide InfaRed Transmitting (IRT) Mulch, Reemay or Agribon spun bonded floating row cover 83 inches wide, clothes pins, wire hoops 74 inches long or high tensile fence wire to make hoops, and irrigation hose (soaker hose, T-tape, etc.) All are available from Fedco’s OGS except the fence wire, which is available at Agway, Tractor Supply or a fencing supply store. A $100 roll will last a decade and can be used to make earth staples and trellis systems.
Lay out the irrigation. Because the entire melon patch is covered with an impermeable mulch, rain can’t easily soak into the ground near the hills, and because overhead watering encourages fungal diseases, drip irrigation is almost mandatory. We use cheap, reusable plastic T-tape. Place one T-tape or soaker hose on each side of the row of hills as close to the plants as practical.
Cover the irrigation system with a weed-proof, soil-warming barrier. IRT mulch looks like dark-colored plastic mulch but warms the soil much more. Both suppress weeds but only IRT allows infrared rays through that actually warm the soil – crucial in cultivating melons in our climate. Roll out two strips of IRT on each side of the row, giving about 7 feet of mulch on each side of the hills. Hold the mulch down with earth staples, boards or rocks so that wind can’t blow it around. You can leave a little gap between each strip for rain to infiltrate the soil. If puddles occur on the mulch, punch a hole in the IRT under the puddle to drain it.
Next set hoops to support the row cover. To do it neatly, use two string lines like the one used to align hills. Cut hoops shorter than the width of the row cover, giving extra row cover on each side to tack down. Put string along each side of the row of hills, about 3 to 4 feet apart, centering hills and plants between the two strings. Poke one end of the hoop into the mulch directly under the first string, and the other end of the hoop under the second string. Move down 3 or 4 feet and repeat with another hoop. Keep going until you reach the end of the row. Try to push hoops into the soil to a uniform depth. You will now have a row of wire arches with plants sitting directly under the apex. Give plants one last drink before covering with row cover.
Lastly stretch lightweight floating row cover over the hoops, distributing the excess equally on each side of the “tunnel.” Two people working together greatly facilitate this process. Adjust the hoops if you have high or low spots. Stretch the fabric over the entire row of hoops, clip the fabric to each end hoop with three clothespins, then clip the fabric to the sides of all the other hoops.
Water transplants every day until they no longer wilt on hot, sunny days. This seems like a lot of work, but once plants take hold, you are basically done until you are ready to eat their fruits.
Leave the row cover on until plants start to climb the sides or until female blossoms (the ones with little melons at their base) appear. Melons are insect pollinated, so you must let insects in if you want fruit. Bees adore melon blossoms. You can remove the hoops when you remove the row cover; if nights turn chilly when fall approaches, simply drape the row cover over the sprawling plants.
Harvesting
There are many types of melons and a lot of variation in how they let us know they are ripe. Fedco’s catalog has some interesting tips for several C. melo varieties, and Southern Exposure Seed Exchange has a thorough treatise on the art of watermelon harvesting. I will give the most common and dependable techniques of this arcane art.
Most cantaloupe varieties give several indications of approaching ripeness. Signs vary a little by variety but may include the presence of netting that becomes a little more pronounced, a perfume aroma from the blossom end, a subtle color shift from gray-green to buff-yellow, and a slight crack appearing at the base of the stem attachment (the abscission layer). Finally, when fruit is lightly to moderately tugged, it separates from the vine. If the fruit has a crack all the way around the stem base and pulls away very easily, it is probably overripe but still edible, although the texture suffers at this point. It is best to harvest before that point (called full slip) and to let the fruit finish ripening indoors for three to seven days until the perfumed aroma tells you it is finally ready. Supermarket melons may never give that signal, but home-grown fruit will.
Watermelons are a little more revealing. The bottom of fruits approaching full ripeness turns yellowish where it touches the ground. The fruit will lose its glossiness and smoothness and turn dull with a roughness and sometimes ridges. It also will give a dull, hollow sound when thumped with your knuckles. My favorite and most reliable way is to follow the stem from the fruit back to where it joins the main stem of the vine; there a tendril juts out from the main vine. If that tendril has started to dry, the fruit is approaching full ripeness. If it is completely dry, the fruit may be a little past prime.
Diseases and Vermin
With decent weather, disease will not be a problem with the above growing method. In dry weather, you can irrigate. In the fall, vines sometimes “collapse” for no apparent reason. I have not had a problem with collapse using the methods described here. Fall can also bring powdery mildew. A prophylactic spray of copper can avoid a crop loss if mildew begins to threaten. Controlling cucumber beetles can also help. For an excessive numbers of beetles, organic growers can use a mix of Steinernema or Heterohabditis nematodes for lasting control. But in general, the healthy, vigorous growth encouraged by the above methods seems to make plants resist the myriad plagues of the home gardener.
Many animals are fond of melons, especially ripe cantaloupes. Deer can wipe out huge plots of melons overnight. Fence your melon patch to exclude deer. Mice can eat the entire inside of a melon by tunneling from the underside and you won’t even notice until you pick up the hollowed fruit. Placing melons on bricks or open-ended milk cartons (see photo) can keep them out of harm’s way and helps them ripen in the sun.
For further references on gardening, see “Growing Your Own Vegetables,” the 1977 USDA Agricultural Information Bulletin #409.
About the author: Adam Tomash and June Zellers have a suburban garden that they wishfully classify as a “research station” for small agriculture.