Growing Organic Crops
The goal of organic gardening is to maintain or improve the ability of the soil to support plant life as it produces a crop of vegetables each year. This depends on a balance between minerals and the animal, microbial, fungal, and plant members of the community. This relationship can be summed up with the common slogan of organic gardeners: “Feed the soil and it will feed the plants.”
Here’s a breakdown of how to grow organic crops.
Why grow organic?

Organic refers to an agricultural system founded on the natural world. Organic farmers and gardeners are stewards of the land and work to build soil, promote ecological balance and encourage biodiversity. Growing and eating organic food supports human and environmental health while fostering thriving local economies.
Growing organic has many benefits for farmers and gardeners, consumers and the environment. Organic crops help reduce the amount of toxic chemicals that enter our bodies because organic agriculture does not permit the use of synthetic chemical pesticides or herbicides. Organic farming also excludes genetically modified organisms (GMOs). As for the environment, growing organic preserves pollinator habitats, promotes biodiversity and builds healthy soil.
Getting started
Much like starting an orchard, growing organic crops starts before vegetables go in the ground. With time and patience, you can grow any crop organically.
What you'll need
The tools you’ll need to get started on your very own organic garden are simple and may include: gloves, pruning shears, shovel, rake, hoe, hand trowel, loppers, garden fork, a garden hose with attachments such as a watering wand, a watering can, and a wheelbarrow.
You will also need seeds or seedlings (also referred to as transplants, plant starts or starter plants). Choose organically grown seed and seedlings whenever possible. Plants grown from organic seed will be better suited to organic growing conditions — without the use of synthetic inputs. On the other hand, conventional seed may have been bred to perform well with applications of chemical pesticides and synthetic fertilizers.
Choosing a site
Location
Most vegetables require full sunlight, or at least five or six hours of direct sun during the middle of the day. Excessive shade can result in spindly, weak plants that are susceptible to disease and produce poor yields. If you have no sunny sites, you can still grow crops, though. A few vegetables will produce in partial shade, although they often will grow quite slowly. Crops that can be grown in partial shade include beets, carrots, kale, lettuce, peas and spinach.
If possible, plant your garden close to the kitchen. This is not only for convenience, but because woodchucks, rabbits and deer are a little less likely to venture close to the house. (Here are some additional strategies for keeping pests at bay.)
Garden size
The size of a garden depends on the availability of space, water and your time — not only to plant, but to care for the garden. The variety and amount of vegetables you want and whether or not you will preserve part of the harvest are also major considerations. Consider starting small and expanding when you are sure you can maintain a larger garden. If space is limited, you may not want to plant corn, squash or melons because they require large amounts of space.
Soil needs

Almost all soil supports some kind of plant life, but the soil must meet basic requirements — including adequate water, air and minerals — to produce a good yield of garden vegetables.
Gardening works well in many types of soil, but common vegetables do best in friable (easily crumbled), porous soils. A deep sandy loam is ideal, as it will provide good aeration and allow for root penetration. A soil that is too sandy will not hold water well and will allow the soluble nutrients to leach away (be carried out of the root zone by water). In contrast, a soil with too much clay will hold nutrients and water, but offer poor aeration and may become waterlogged at times.
Avoid areas composed of “fill dirt.” Fill usually consists of bottom soil (soil that was beneath the richer topsoil), stones and debris. The fertility is usually very poor. A second type of site to avoid is a depression that remains wet after brief rains. This wet soil will have very poor aeration — and the roots of vegetables need oxygen.
Adding organic matter
Organic matter is important in all soils because it improves both soil structure and fertility, while also feeding soil life. Organic matter releases many plant nutrients as it decomposes, so it’s basically an organic fertilizer. Furthermore, it has a property that often is a very important advantage over synthetic fertilizers: Organic matter releases minerals slowly over a long period of time. This reduces leaching, decreases the risk of throwing the soil system out of balance and decreases the risk of “burning” the plant. (Some synthetic chemical fertilizers are so concentrated that they can kill, or burn, plant tissues. Some manures, applied to excess or when too fresh, can do the same.) Organic matter has to be added regularly though, as it continually decomposes.
Types of organic matter
Generally, there are three types of organic matter that are best suited for growing crops: farm manure (aka animal manure), green manure and compost. Here’s a breakdown of each.
Farm Manure
Uses
Farm manure (or animal manure) is one of the best sources of organic matter and can supply the bulk of the fertility that vegetable gardens need. The general rate of application for cattle, hog or horse manure is 300 to 500 pounds per 1,000 square feet of garden. A simple way to estimate this is to apply a layer 2 to 4 inches thick on top of the soil and work it in to a 6-inch depth. Poultry, sheep, goat and rabbit manures should be applied at half this rate because of their higher nutrient content. If organic matter increases to more than 7 percent, avoid adding manure for a year or two.
If you are using cattle, hog or horse manure, work in rock phosphate as well at a rate of 4 to 5 pounds per 100 square feet (if your soil test indicates a need for phosphorus). Unless manure is well rotted, it should be applied before plowing, tilling or spading and then be turned under. Concentrated manure should not be piled around a plant as it may burn the plant.
Green Manure
Uses
Organic matter levels can be maintained or increased in a soil by planting a green manure. A green manure is a cover crop grown with the intent of turning it under while it is still green. In addition to adding organic matter, green manures also return nutrients accumulated in the plants to the soil. Legumes make for a good green manure because they possess deep roots that draw up minerals from the subsoil. Also, they live in harmony with bacteria that can incorporate nitrogen into the ground that will also be released in the soil when the plant is turned under.
Sow a green manure either as a winter cover crop or in a portion of the garden during the growing season. Some common green manures are: oats (planted in early fall for a winter cover or grown in the summer), buckwheat (grown in summer) or red clover (grown in summer).
Compost
Uses
Compost is an excellent source of organic matter and nutrients. In its finished form, it contains the major plant nutrients — nitrogen, phosphorus and potassium — as well as minor nutrients. Furthermore, it releases these nutrients slowly, thus minimizing runoff and leaching. A compost pile may be made of mix of leaves, weeds, hay, animal manure, waste vegetable matter, coffee grounds — essentially any vegetable matter. Items to avoid, because they decompose slowly and attract unwanted animals, include meat, bones and fat.
Pile the organic matter in layers if possible: First an 8-inch layer of vegetable matter, then a 4-inch layer of manure, then a thin layer of soil, then repeat the layers. The pile needs to be quite large and built all at once before it will begin composting — 5 feet in diameter and 3 to 5 feet in height is a recommended option. Smaller piles and piles built bit by bit decompose and produce a fine soil amendment, but may not produce enough heat to kill pathogens and weed seeds.
As you make the layers, water them. The pile should be kept moist but not wet. Turn the pile with a fork 10 days after you start it and again two or three weeks later. The compost is finished when it looks dark and decomposed and smells earthy. Good compost can be made in 6 months, but under less than ideal conditions, it may take a year. Here are some helpful tips for making compost at home.
How to fortify your soil before planting
If you create your garden site in an old field or lawn, you are likely going to encounter a few problems during the first season. First, nitrogen is unavailable to the plants while the grass decomposes because of the rapid growth of bacteria. The second problem is weeds. Many of the perennial grasses that you turned under when preparing the garden spot will grow right back. Many species of insects that live in the sod, such as grubs and wireworms, may also become serious pests of vegetable crops in the first year. You can avoid these problems when you properly prepare your soil before planting crops. Here’s how:
- Take a soil test to determine fertilizer requirements. You can obtain a test kit at your local Cooperative Extension Service office.
- Turn over sod in late summer the year before you plant the garden. Add lime, rock phosphate and manure as recommended by a soil test, and plant a winter cover crop such as winter rye (or oats if you do not have equipment that can turn under the rye the following spring).
- Turn the cover crop under early in the spring, once the soil is no longer muddy, but at least a few weeks before planting the garden.
- Plant vegetables that are fairly competitive — such as tomatoes, corn, squash, beans or cole crops (i.e, cabbage, broccoli and kale) in the first year, as many weeds may still be prevalent. Transplanting seedlings instead of sowing directly seeds in the garden will help give you head start.
- Keep the area well weeded all summer. The vegetables listed above can all be mulched, which will help control weeds.
- Cut the grass short around the border of the garden to avoid a source of weed seeds.
Planting your crops
When to plant
You should plant your garden over a period of three to four months.
Some crops go in early because they tolerate early spring weather; need cool weather; or need long daylengths or a long growing season. Other plants cannot tolerate cool weather or spring frosts and are planted later. Some long-season crops cannot tolerate frosts and need to be started indoors or purchased as seedlings and transplanted to the garden. Frost-sensitive plants should not be put out unprotected before the frost-free date. Table III lists planting dates according to the number of days before or after the frost-free date. If you are not sure when the frost dates are in your area, call your local Cooperative Extension.
MOFGA has a full seed planting calendar that offers a wealth of information on when to start planting. We also have a seed inventory list so you can keep track of your organic crops. Looking for organic seed? Here is a list of suppliers.

Preparing the soil for planting
Do not work soils that are too wet. A good test is to mold a handful of soil into a ball. If the ball is not sticky and crumbles readily when pressed with the thumb, the soil is ready to be worked. Working wet soil, especially with power equipment, destroys its structure and compacts it.
Some gardeners turn the soil only when they are first gardening on a particular spot. After that, if weeds are not a problem, they just push a garden fork into the soil and wiggle it back and forth a few inches to loosen the soil, rather than turning the soil over completely. This is easier on the gardener and may be easier on the soil life (although turning a green manure under can stimulate a great increase in soil life).
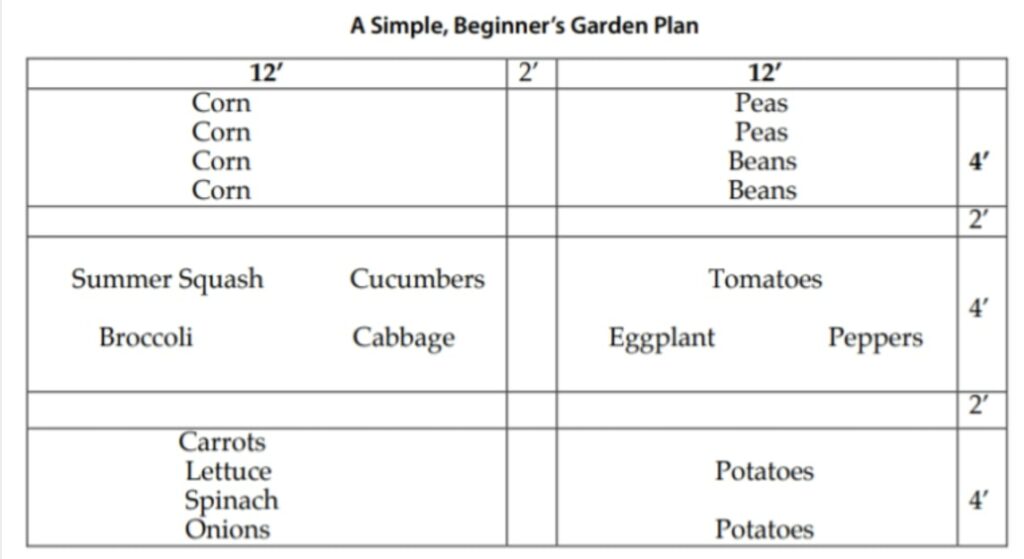
Planting the crops
Draw a garden plan before planting. Include the locations of crops, length of rows and spacing between rows. Seed catalogs offer lots of helpful information regarding recommended plant spacing, both in row and in between rows. Plan to plant tall vegetables, such as tomatoes, peas and corn, at the north side of the garden, if possible, so that they do not shade the shorter crops. Avoid planting crops that are susceptible to the same insects or diseases near each other.
When you are ready to plant your crops, first prepare a clean seed bed that is free of weeds, rocks and other debris. Make holes for transplanted crops or a furrow for direct seeding according to recommended spacing by crop type. Add compost and/or fertilizer if necessary. Transplant your hardened off seedlings or directly sow seeds.
After this, you may choose to add mulch around the seedlings or direct-seeded beds to reduce evaporation and weeds (but be careful not to smother them). Finally, water your newly planted crops in so they start producing roots and set in the ground.
As the years go by, make sure to rotate the crops you plant in your garden. Crop rotation is important even in a small garden. Many plant pests overwinter in the soil and will return from year to year if provided with a host each spring. Furthermore, crops repeatedly planted in the same place deplete the soil of particular nutrients. Generally, crops in the same crop family should not be replanted in a garden space for two or three years. Ideally, gardeners should have two or more garden plots far apart from each other.
Raised beds

Raised beds may be a great way to simplify gardening.
Most gardeners plant in rows in a flat garden, but some prepare raised beds. These beds are either free-standing mounds of soil, perhaps 6 to 12 inches above ground level and 3 to 5 feet wide, or they are supported on the sides by wood, stone, concrete blocks or other materials. Supported beds can be much deeper than 6 to 12 inches. Beds offer excellent drainage and aeration, are quick to warm in the spring and maintain long-lasting soil structure because the soil is never trampled. Furthermore, you can amend the soil much more efficiently because it is in a confined space and you don’t have to waste amendments on permanent walkways between the beds. With raised beds, you can treat each bed as a distinct field and receive different amendments or cover crops.
Most gardeners plant in rows in a flat garden, but some prepare raised beds. These beds are either free-standing mounds of soil, perhaps 6 to 12 inches above ground level and 3 to 5 feet wide, or they are supported on the sides by wood, stone, concrete blocks or other materials. Supported beds can be much deeper than 6 to 12 inches. Beds offer excellent drainage and aeration, are quick to warm in the spring and maintain long-lasting soil structure because the soil is never trampled. Furthermore, you can amend the soil much more efficiently because it is in a confined space and you don’t have to waste amendments on permanent walkways between the beds. With raised beds, you can treat each bed as a distinct field and receive different amendments or cover crops.
You can turn in compost, loamy soil, rotted manure and other amendments each year to build up the bed. Weeds are also easier to control in this design, but quackgrass may creep in. Because conditions are easy to monitor, one can garden much more intensively, i.e., place plants much closer together. On the other hand, close planting increases the chance of disease or insect spread.
Raised beds can dry out faster than level planting areas. If you have a very light, sandy soil, level gardens may be a better choice for you.
Using transplants for growing crops
Because of Maine’s short growing season, gardeners wishing to grow long-season, frost-sensitive crops, such as tomatoes and peppers, will need to plant seedlings that have been started indoors. Home gardeners that do not have a greenhouse are often advised to buy transplants from local supply stores. MOFGA has an organic seedling map to help you find local sources.
The biggest challenge with starting transplants at home is ensuring ample sunlight: healthy seedlings require at least four hours (and preferably six to eight hours) of direct sunlight or sufficient artificial light each day; otherwise they will be tall, spindly and susceptible to disease.
Soil mixes for seedlings
The advantages of home-raised transplants are that you get to choose from a great selection of varieties, and you can raise them free of fungicides, insecticides and synthetic fertilizers.
The key to raising satisfactory transplants, besides providing enough light, is fertile, disease-free organic soil mixtures. Soil-less mixes are highly recommended, because they are less likely to harbor disease than mixes that contain soil, are lightweight and aerated, and hold water well. These mixtures are available in garden stores.
These mixes need to have all nutrients added. Most store-bought mixes come with synthetic fertilizer added, but fertilizer-free mixes are available. Watering with manure or compost tea, or liquid fish or seaweed products once a week is a good substitute for synthetic fertilizers. A mixture of equal parts soil, compost, vermiculite and peat will provide the nutrients, without supplements, for finished transplants raised up to eight weeks. You can “sterilize” this mixture by baking the soil and compost in an oven at 350 degrees Fahrenheit for 45 minutes. All parts of the soil should reach 180 degrees Fahrenheit and should stay at that temperature for 30 minutes. Overcooking or overheating releases toxic materials and kills helpful microorganisms.
Growing transplants from seed
Wet the mixture in a bucket. If there is peat in the mix, it may require a few hours to become wet; don’t use hot water — it can hasten the wetting. After the mix is uniformly moist, put it into growing containers (flats, cells or individual containers).
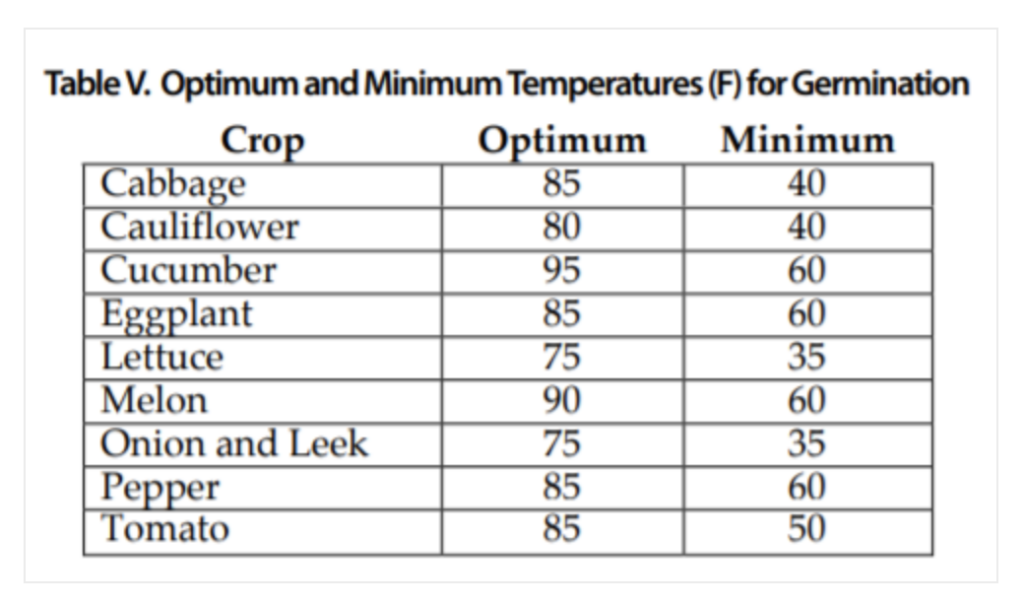
Plant extra seeds — upon germination, you can thin out the smaller or weakest looking seedlings; leave one per cell or container. Warmth is very important for germination of many vegetables. (See Table V for recommended and minimum germination temperatures.) If your growing area is near the minimum temperature, provide supplemental heat (using a heating mat made for germinating seeds, for example). Excess watering may promote fungal diseases. However, once seedlings have a few true leaves, you may need to water them daily.
Hardening off transplants
Plants grown indoors are sensitive to outdoor conditions, including wide fluctuations in temperatures, direct sunlight and wind. Thus, you should harden off seedlings, or acclimate them to outside temperatures, before they are set in the garden. A week or two before the date when the transplants can be safely set in the garden, slowly introduce them to direct sun and evening temperatures by putting them in a cold frame (or just outside, in a protected spot) for an hour or two a day, and then gradually extending the time until they are outside all day. Watch their water needs. If using a cold frame, keep an eye on the temperature to ensure that the plants don’t get too hot on sunny days.
Types of vegetable crops to grow in your garden
Onions
Soil Preparation
Onions do best grown in sandy loam soil that is rich in organic matter, but they can be grown in most soils. The recommended pH is 6 to 6.5. Onions are heavy feeders. A fertile soil should be prepared before planting by working in an inch-thick layer of a mixture of 8 parts compost or manure, 1 part wood ashes (if the pH is low) and 2 parts phosphate rock (if the soil needs phosphorus) to the top 6 inches of soil.
Propagation
The initiation of the onion bulb depends on day length. The varieties grown in Maine require 15 hours of daylight, so onions must be planted in early spring so that they have grown enough leaves to bulb well once we reach 15-hour days. However, very early spring plantings are more susceptible to the onion root maggot. (See below.)
Most varieties require a long season, so seeds should be started indoors in mid-February to early March.
You can grow onions from sets (small bulbs grown the previous year and available at farm supply stores), seedlings or seeds. If direct sowing, sow two to four seeds per inch, 1/4-inch deep. For large bulbs, thin throughout the season to allow 4 inches on all sides of each onion. You can eat the thinned onions as scallions. Plant transplants 4 inches apart. Sets larger than 1/2-inch in diameter are likely to go to seed before developing good bulbs. Plant sets 4 inches apart with the top sticking just above the soil surface.
Culture
Keep onions well watered; they grow best with an inch of water per week. They compete poorly with other vegetables and weeds and need frequent weeding — and they are shallow-rooted, so don’t hoe deeply and don’t let weeds get too big before you pull them.
Common Problems
The onion root maggot fly lays eggs in early spring and the maggots crawl down to cut the roots. A heavy infestation can destroy the whole crop. Infected onions will not store well, because fungi invade through holes on the bottom of the onion made by the maggot. The best protection is to cover the whole planting with a polyester row cover. A mixture of ashes and rock phosphate laid at the soil line around the onion plants may prevent some infection. Beneficial nematodes are good for controlling root maggots; they are available through garden supply companies.
Harvest
For fall and winter storage, allow onion tops to fall over and turn brown. Knock down any that do not fall over with the masses. After the necks and tops look dry (about 10 days after knockdown), the onions can be harvested. They need to be cured before storage. Once the necks are fully dry, they can be trimmed to 1 inch. Onions can then be stored in a cool, dry place. Do not store them in plastic bags; mesh bags allow for air movement.
Yield: 50 pounds per 50-foot row
Leeks
Soil Preparation
Fertilization requirements are similar to those for onions.
Propagation
Farmers generally grow leeks from seeds that they start indoors in February (similar to starting onions). You should plant your leeks in a trench or hole (often called a “dibble”) about 6 inches deep; allow rain water or irrigation to fill the hole. For full-size leeks, plants should be spaced at least 6 inches apart in row, with 24 inches between rows — to reserve ample space for hilling. You can also interplant leeks with other crops, such as kale and early spring pac choy, though this might impact blanching.
Culture
Like onions, they compete poorly with other vegetables and weeds and need frequent weeding.
Gradually hill the leeks with soil during the growing season (two to three times) to blanch (or whiten) the stalks of the leeks. When planting in dibbles, the soil filling in around the leeks may reduce the need for extensive hilling.
Once you start hilling the leeks, the need for weeding diminishes.
Common Problems
Leek moth is an invasive pest of allium crops like onions, garlic, shallots and chives, and, as the name suggests, they are particularly fond of leeks. As with most moth pests the crop damage is from its larval caterpillar stage, of which there are two to three generations. Overwintered adults emerge in the spring and fly at night to both mate and seek out host plants to lay eggs on. Eggs are laid at the base of host plants, and larvae (caterpillars) emerge in about a week to begin feeding. After feeding for about two weeks, larvae pupate on the host plant, or very close nearby, emerging as adults 10 days later. Feeding damage from the first generation of the year can stunt growth as leaves are attacked, and later generations can impact storage and saleability of onions, garlic and leeks as they eat their way in the direction of the bulb.
You can use row cover or exclusion netting to prevent adult moths from laying eggs on your crop. Row cover can be removed during the day to cultivate or harvest, as adult leek moths only fly at night.
Harvest and Storage
You can use leeks throughout the season or harvest them in the fall. To harvest, gently loosen the soil around each leek with a digging fork or spade. Leeks harvested in late fall can be packed in baskets and stored in a root cellar. Some varieties also overwinter in the garden.
Garlic
Soil Preparation
Garlic grows best in well-aerated, deep, fertile soil with a pH of 6.5 to 6.7. Prepare the soil a few weeks in advance of fall planting. Work in an inch-thick layer of rich compost or a well-rotted manure.
Propagation
Farmers plant garlic around the mid-October in central Maine. Break the head of garlic into individual cloves and plant each clove 2 to 4 inches deep, about 6 inches apart in rows that are about 12 inches apart. To protect the bulbs through the winter, cover the area with a 3- to 6-inch layer of mulch, such as straw or leaves.
Culture
In the spring, the garlic shoots will come up right through the mulch. Keep them evenly watered but be sure not to over-water. The ground should not be so wet or the drainage so poor that the roots are sitting in water. When the hardneck varieties send up flower shoots, known as garlic scapes, cut them off; they can be used in place of garlic in cooking.
Common Problems
Three unrelated fungi cause three garlic diseases that growers should be aware of: penicillium decay, Botrytis rot and white rot. All three spread with garlic “seed” (cloves), and can be avoided by buying certified disease-free seed garlic.
Harvest and Storage
Harvest your garlic in the summer. When the leaves start turning brown, it is almost harvest time. Garlic will store best if harvested when about half the leaves are brown, the cloves are softly bulging and the outer papery wrapper is starting to dry. Do not let the bulbs sit in the ground after they are ready to harvest or the cloves will start to break through their wrappers and they won’t store well. Pull up the bulbs when they are ready and let them cure for a few weeks in a dry, shady spot.
Don’t wash them. When they are dry, you can gently brush off the dirt. After curing, put the garlic in a cold, relatively dry place that never drops below freezing. Garlic stores very well through the whole winter.
Broccoli and Cauliflower
Soil Preparation
Members of the Brassica genus (also referred to as cole crops), broccoli and cauliflower do best in rich loams with good water-holding capacity. You can grow crops on most soil types if water is available when needed. The recommended pH is 6 to 6.8.
Cole crops are quite sensitive to low pH, and, at pH above 7.2, a boron deficiency may develop, especially in cauliflower. Work manure, greensand and phosphate rock (if needed) into the soil before planting. If a soil test suggests a boron deficiency, you can create a dilute solution of household borax (0.1 pound/100 gallons of water) to use as a foliar spray.
Propagation
Broccoli and cauliflower are grown for their immature flowers. Both produce much better heads in cool weather, and you should plant them to time their flowering with early summer (plant in early spring from transplants) or early fall (plant seedlings in the garden in late June or early July). For early spring transplants, sow seeds indoors about four weeks (six weeks for cauliflower) before you expect to set the plants out. For a later crop, sow seeds in a seedbed in the garden in late spring or early summer. (See Table III.) Many varieties of cauliflower do not form good heads in warm weather; fall ripening is best.
Set out broccoli plants 12 to 18 inches apart in rows that are 18 to 36 inches apart; space cauliflower 18 inches with 24 to 26 inches between rows.
Cole crops are often set out without being hardened off in order to avoid a check in growth. Plants are somewhat hardy and will take a slight frost, but a heavier frost may kill them. Cauliflower is the most sensitive. Transplant on a cloudy day or in the evening, and water the transplants in.
Culture
Keep the soil evenly moist, avoiding long dry spells. Weed carefully, as the roots are shallow. A side-dressing of well-rotted manure or compost after plants have grown three or so weeks in the field is useful.
Cauliflower heads are kept white by blanching — tying the outside leaves together around the developing head when it is 2 to 3 inches in diameter. (Some newer varieties are self-blanching; their leaves grow around their heads naturally and do not have to be tied.)
Common Problems
Cabbage maggots (the larvae of a fly) will attack cole crops that are set out early. Symptoms are yellowing of the lower leaves, slow growth or wilting. Injury results from maggots feeding on root surfaces and tunneling through them. The adult fly looks a bit like a small housefly and lays eggs in April or early May on the base of the plant. Eggs hatch in a few days, and the maggots crawl into the soil. Cabbage, broccoli, cauliflower and radishes are favorites. The most effective control is covering plant rows with polyester cloth (floating row cover). Dusting the base of the plant with a mixture of rock phosphate and wood ash may prevent the maggots from crawling. Beneficial nematodes, available from certain garden supply companies, may work very well.
Imported cabbageworm and the cabbage looper are caterpillars that feed on cabbage and broccoli as well as some other garden plants. They are easily controlled by the microbial pesticide Bacillus thuringiensis (Bt).
Cutworms, the larvae of a night-flying moth, are a major problem, especially for transplants. Cutworms crawl along the surface of the soil at night and sever the plant right at the soil line. Some species climb up the plant and sever leaves. The best protection is to cut the bottom from a paper cup and slip the cup over the small plant, pressing it into the soil slightly, to form a barrier that cutworms can’t pass.
Harvest
Cut out large, central heads of broccoli when they are ready and before they start to grow loose. This will promote the growth of smaller side heads.
Harvest cauliflower heads when they are still compact and fairly smooth.
Yield:
Broccoli: 27 pounds per 50-foot row
Cauliflower: 30 pounds per 50-foot row
Cabbage
Soil Preparation
A member of the Brassica genus (also referred to as cole crops), cabbage does best in rich loams with good water-holding capacity. Fertilization requirements are similar to those for broccoli and cauliflower.
Propagation
For early spring transplants, sow cabbage seeds indoors about four to six weeks before you plan to set the plants out. Set out plants 12 to 18 inches apart in rows that are 18 to 36 inches apart. You can have a supply of cabbage all summer by spring planting varieties with different maturing dates. You can also grow a fall crop for storage — select a midseason or fall variety, and start seedlings in May to transplant in June or July.
Culture
See cultural requirements for broccoli and cauliflower.
Common Problems
See common problems for broccoli and cauliflower.
Harvest and Storage
Harvest when heads become tight. Mature heads do not last long in the field: They will split as they become over-mature, especially after a rain. A slice with a spade that cuts off part of the root system may prevent splitting. You can also gently twist the plant to disturb its roots.
For winter storage, leave much of the stem attached after removing the loose outer leaves and place them sideways on a cellar shelf.
Yield:
75 pounds per 50-foot row
Brussels Sprouts
Soil Preparation
Related to cabbage, broccoli and cauliflower, Brussels sprouts perform well in rich loams with good water-holding capacity. Fertilization requirements are similar to those for broccoli and cauliflower.
Propagation
Brussels sprouts require a relatively long growing season and ample space. Sow seeds indoors in May and transplant into the garden four to six weeks later. Space plants 24 inches within the row, and 34 to 48 inches between rows.
Culture
See cultural requirements for broccoli and cauliflower.
Common Problems
See common problems for broccoli and cauliflower.
Harvest and Storage
You can harvest Brussels sprouts over a long period. Pick as soon as the buds become firm. The flavor is best after a hard frost or two.
Yield:
80 pounds per 50-foot row
Beans
Soil preparation
Legumes require less soil nitrogen than other garden vegetables and may actually improve soil fertility as they grow and when the crop residue is turned under by adding nitrogen. They require a well-drained soil, rich in organic matter, with a pH between 6 and 7.5. Work in rock phosphate (if needed) and wood ashes (but if the pH is high, use Sul-Po-Mag instead of wood ashes). In sandy soils that are low in organic matter, a small amount of nitrogen fertilizer will be necessary to get the plants started.
Propagation
Beans are sensitive to frost, and the seed will not germinate in cool soil. Soil temperatures should be at least 60 degrees Fahrenheit. Successive plantings every 10 days to two weeks until mid-July will ensure a steady supply. Sow seeds 1 to 1-1/2 inches apart in rows 2 to 2-1/2 feet apart; 3/4 inch deep in loam soils and 1 inch deep in sandy soils.
Culture
Bush beans can be grown without support, but pole bean varieties, such as runner beans, will require trellising or staking. Pole bean seeds should be sown around the base of the trellis system.
Common Problems
Mexican bean beetles may be pests on snap beans, soybeans and lima beans. While they are not a pest for every farm or garden, some farms report repeated significant damage from these pests and have to take action to prevent crop loss. Using biological control can reduce the need for insecticides.
Harvest
You should harvest snap beans when they reach full length and before the seeds begin to develop. Frequent harvest helps the plant to continue to produce new pods.
Harvest dry beans (such as soy or kidney beans) after the pods are brown and dry, or nearly so. Once the beans are air dried, they will store for years if kept cool and dry.
Yield:
30 pounds snap beans per 50-foot row
Peas
Soil preparation
Legumes require less soil nitrogen than other garden vegetables and may actually improve soil fertility as they grow and when the crop residue is turned under by adding nitrogen. They require a well-drained soil, rich in organic matter, with a pH between 6 and 7.5. Work in rock phosphate (if needed) and wood ashes (but if the pH is high, use Sul-Po-Mag instead of wood ashes). In sandy soils that are low in organic matter, a small amount of nitrogen fertilizer will be necessary to get the plants started.
Propagation
You can sow peas directly into the ground early in the spring after the soil temperature reaches 40 degrees Fahrenheit, although seeds that are not treated with a fungicide may show spotty germination. Better germination of untreated seeds occurs when the soil is 50 to 55 degrees. Midsummer plantings for a later crop of peas are possible but often give disappointing results because of the heat of summer.
Inoculation with nitrogen-fixing bacteria is beneficial, at least the first time the particular legume is grown in your garden. Inoculates come as a dry powder (available in most garden stores and seed catalogs). Wet the seeds and shake them around in the powder just before planting.
Peas can be planted in rows, but other methods have advantages. You can plant tall varieties on both sides of a wire fence. Plant dwarf varieties in wide rows, since they do not suffer from some crowding. Leave about 2 inches on all sides of each seed.
Culture
Tall varieties of peas require support; here are some options for trellis systems.
Their upright growth habit makes peas a good candidate for companion planting with shorter crops, such as carrots or parsnips. They can also share bed space with broccoli, summer cabbage, lettuce, early kohlrabi or green onions.
Be mindful when weeding peas — they have shallow roots and can be disturbed quite easily.
Common Problems
Fusarium wilt of peas is a fungal disease that first appears as downward curling leaves, which become pale green and flaccid, then turn yellow, starting at the bottom and progressing upward until the entire plant it is yellow — and eventually become dry and crisp.
Crop rotation and sanitation will help manage the spread and buildup of pea wilts but are of limited value because of the persistence of the spores once they get into the soil. Use long rotations with non-pea crops. Clean trellises and stakes, physically removing any debris, to avoid bringing infected pea debris to a new area or field. By far the best control of Fusarium wilt of peas is use of resistant varieties.
Harvest
Peas are available as 1) edible pod varieties called snow peas in which the pod is harvested before the pea (the seed) develops; 2) snap peas, which offer both edible pods and peas (seeds); and 3) plain fresh peas in which only the pea (seed) is edible. The sweet flavor of peas is short-lived, so you should harvest them as soon as they ripen.
Yields:
25 pounds per 50-foot row
Tomatoes
Soil Preparation
A sandy loam that is well drained and contains a lot of organic matter is ideal for growing tomatoes. The pH should be 6 to 6.5. You should work in well-rotted manure or compost and a handful each of rock phosphate (if needed) and greensand into the hole which the transplants will go. Tomatoes are heavy feeders. Too much nitrogen, however, often leads to big, lush plants and delayed fruiting.
Propagation
Tomatoes are sensitive to frost and require a long growing season. Start tomatoes indoors (by April 14, according to our seed planting calendar) and transplant seedlings after the frost-free date for your area. You should grow early and midseason varieties of tomatoes to have a supply from midsummer to fall. Ideally, plant tomato seedlings 2 to 3 feet apart in rows 4 to 5 feet apart. If the transplants are tall and leggy, plant them 2 to 6 inches deeper in the soil than they were in the pot.
Culture
Tomatoes can grow with or without a trellis, depending on whether they are a determinate (bush) or indeterminate (vining) variety. Staking, or growing with wire cages, keeps the fruit cleaner and helps prevent disease.
Tomatoes benefit from mulch, which can help reduce diseases that otherwise splash onto plants from the soil during rains (see early blight below). But wait for the soil to warm before applying organic mulches, or use black plastic. You can get a jump on the season by using both black plastic mulch and row covers. Tomatoes also perform well when grown under cover, such as in a hoophouse.
Tomato yields are improved with pruning. Tomato pruning involves “suckering” — the removal of side shoots from the leaf axil (where the leaf meets the stem) that would otherwise grow to become whole new stems with their own leaves and fruit.
Common Problems
Fruit may not set or blossoms may drop if prolonged spells of cool nights occur early in the season. Cold and hot days (over 90 degrees Fahrenheit) prevent pollination, which, of course, prevents fruit development.
Early blight is a fungus infection of the tomato leaves that may spread to the fruit. It is characterized by small, brown-yellow spots with concentric rings. The whole leaf will eventually turn brown and fall off the plant. Cool, humid conditions and shaded plantings promote the spread of the disease. The fungus overwinters on plant debris, so compost plants at the end of the season and rotate the location of the tomatoes every few seasons. Do not plant tomatoes where other family members (peppers, eggplants and potatoes) have just grown.
Cutworms can also create problems in tomato plots. Cutworms crawl along the surface of the soil at night and sever the plant right at the soil line. Some species climb up the plant and sever leaves. The best protection is to cut the bottom from a paper cup and slip the cup over the small plant, pressing it into the soil slightly, to form a barrier that cutworms can’t pass.
Tomato hornworms may be the most notorious tomato pest, however. They are giant caterpillars that can do a vast amount of eating in a very short amount of time. Sometimes it seems that healthy looking tomato or pepper plants are stripped of their leaves overnight, leaving bare stems. The hornworms will also attack fruit, eating gouges out so large that they look more like bites of a furry animal than an insect. Watch for feeding damage and frass (insect poop) around tomato and pepper plants. The frass may be your first sign there is a problem. Hand picking works well but it is easy to overlook one or two caterpillars, which can do significant damage in a day or two. Many growers use a black light at night to help find hornworms, as the caterpillars fluoresce brightly. Bacillus thuringiensis (Bt) can also be used.
Harvest
Fruits will ripen from blossom end. Get to know the varieties that you plant so you know what ripe fruit will look like. Fruit can be harvested after any initial coloring and will continue to mature off of the plant, though the flavor will be affected. Handle soft fruit carefully.
Yields:
100 pounds per 50-row foot
Peppers
Soil Preparation
Like tomatoes, to which they are related, peppers, grow best in a sandy loam soil that is well drained and contains a lot of organic matter. See fertility requirements for tomatoes.
Propagation
Peppers are sensitive to frost and require a long growing season — start indoors in March. They germinate slowly and a heat mat is useful for maintaining consistently warm soil temperatures. Transplant pepper seedlings after the frost-free date 12 to 18 inches apart in rows 2 to 3 feet apart.
Culture
Peppers sometimes benefit from staking for support. They also benefit from mulch, but wait for the soil to warm before applying organic mulches, or use black plastic. You can get a jump on the season by using both black plastic mulch and row covers.
Common Problems
Fruit may not set or blossoms may drop if prolonged spells of cool nights occur early in the season. Cold and hot days (over 90 degrees Fahrenheit) prevent pollination, which, of course, prevents fruit development.
Cutworms can also be a problem. Cut the bottom from a paper cup and slip the cup over the small plant, pressing it into the soil slightly, to form a barrier around tender seedlings.
Tomato hornworms also attack pepper plants. Keep an eye out for feeding damage and frass (insect poop) around plants. Handpick or apply Bacillus thuringiensis (Bt) for control.
Harvest
Pick ripe peppers regularly to encourage continued production.
Yield: 23 pounds per 50-foot row
Eggplant
Soil Preparation
Eggplant prefer a well-drained sandy loam high in organic matter with a pH between 6 and 6.5. See fertilization requirements for tomatoes.
Propagation
Eggplants are frost sensitive and need to be started indoors; transplant seedlings after the frost-free date at 18 inches apart in rows 3 feet apart.
Culture
Eggplant benefit from plastic mulch and row cover early in the season for added warmth. Row cover is also helpful for insect control.
Common Problems
Fruit may not set or blossoms may drop if prolonged spells of cool nights occur early in the season. Cold and hot days (over 90 degrees Fahrenheit) prevent pollination, which, of course, prevents fruit development.
The Colorado potato beetle is especially damaging to young eggplants. The best way to control them in the garden is by hand picking both adults and larvae and crushing the bright yellow egg masses. A natural-based insecticide called Monterey Garden Insect Spray helps control potato beetles. Row covers may also be used and act as a deterrent to flea beetles as well.
Use collars when transplanting young seedlings to protect them from cut worms.
Harvest
Harvest regularly to encourage continued fruit set.
Yield: 50 pounds per 50-foot row
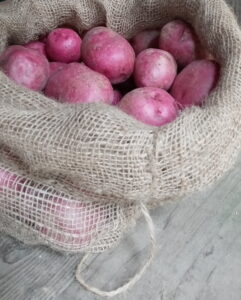
Potatoes
Soil Preparation
Potatoes grow best in moderately fertile soil that is high in phosphorus and potassium with at least moderate amounts of nitrogen available. Excess nitrogen will encourage too much foliage at the expense of tuber formation. Work in about an inch of compost along with phosphate rock (4 pounds per 100 square feet, if needed) and Sul-Po-Mag (1 pounds per 100 square feet). Although potatoes grow best at a pH around 6.0, a pH higher than 5.7 promotes the fungal disease called scab. You should apply manure in the fall before planting; otherwise it can promote scab.
Propagation
Potatoes are grown from seed pieces, which are pieces of the potato tuber with buds (commonly called “eyes”) on them. Although you can use old potatoes for seed pieces, this is not recommended because they commonly carry diseases. Do not plant grocery store potatoes, because, unless they are organic, they are commonly treated with anti-sprouting chemicals. Instead, buy certified disease-free potato “seed” (actual tubers).
Cut the seed tubers into pieces about the size of a hen’s egg and be sure to have at least one to two eyes on each piece. Let the cut surfaces dry for a day or two, and then plant the seed 4 to 6 inches deep, about 10 inches apart, in rows that are 2 to 3 feet apart. For larger potatoes, space seed pieces 15 inches apart in rows.
You can also “greensprout” potatoes by exposing seed tubers to natural or artificial light in a warm environment prior to planting. This process leads to the development of short, strong sprouts on the seed pieces — and may result in a faster-growing plant.
Culture
When the plants are 4 to 6 inches high, hoe up the soil up around the plants to cover the stems. This prevents the tubers from exposure to light and turning green, and it promotes more underground stem development. Water plants during long dry spells to maintain even moisture during the season. Alternate dry and wet spells produce cavities in the tubers and knobby potatoes.
Common Problems
Colorado potato beetle is the most prevalent insect. The best way to control them in the garden is by hand picking both adults and larvae and crushing the bright yellow egg masses. A natural-based insecticide called Monterey Garden Insect Spray helps control potato beetles.
Flea beetles will attack young plants and, in large numbers, may destroy them, but are usually not severe. The best way to prevent the insects is with floating row covers.
The potato leafhopper is also a major problem some years. This is a tiny, flighty insect that sucks nutrition out of the plant. The leaves brown from the edges and often die from what looks like a disease. Scout early and through the season for the pest. Some potato varieties are much more resistant than others. For example, Norland is very attractive to them and Keuka is much less so.
Early and late blight are common fungal diseases that destroy potato foliage and infect the tubers. Late blight, one of the causes of the Irish famine in the 19th century, appears as brown-black areas on leaves and brown to purple discoloration on the skin of the tuber. The disease is carried through the winter on infected tubers. During the growing season, the spread of the disease depends on weather conditions. Spores are produced only in cool weather, below 60 degrees Fahrenheit, then invade new leaves when higher temperatures occur. A cool, wet July is often followed by blight in August and September. Some varieties (Kennebec, Essex, Cherokee, Sebago) are resistant to the common strain of blight, but not to some new strains. Copper may offer some control. If leaves become infected, delay digging tubers until a week after the first frost has killed the vines; otherwise you will infect the tubers by spores on the soil surface. Destroy infected tubers and in the following year, watch for and destroy any volunteer potatoes growing from the year before.
Harvest
Dig potatoes after the tops turn brown. Cure them for about 10 days by storing them at room temperature in the dark, then store them in a cool (40 degrees Fahrenheit), dark cellar.
Yield per 50-foot row: 60 pounds.
Cucumbers
Soil Preparation
A well-drained soil that is high in humus is best for cucurbits. Cucumbers, along with zucchini, summer squash, melons, winter squash and pumpkins, do well when planted in hills. (A hill is not a mound of soil but a group of three to five plants.) Prepare the hill by digging a hole 10 to 12 inches deep and putting 1/2 to 1 cup of rock phosphate (if needed) and 4 or 5 cups of well-rotted manure in the bottom. Mix a cup of wood ashes with the soil from the hole and stir some of that mixture into the manure and phosphate. Then fill in the hole.
Propagation
Early cucumbers grow best from transplants started indoors four weeks before the last spring frost. Main season cucumbers are generally direct-seeded outdoors. Some gardeners transplant their first round of cucumbers and direct seed another round on the same day to ensure a longer harvest season. Space hills 3 to 5 feet apart. If planting in rows, space plants/seeds 1 foot apart in rows 5 to 6 feet apart. (If trellising, spacing can be tighter.)
Seed will not germinate in cool soil, so wait until it reaches 60 to 65 degrees Fahrenheit if direct seeding. Cucumbers and other cucurbits benefit from warm soil and even moisture and do well planted through black plastic. Put the plastic on the soil a week or two before planting to help warm the soil.
Culture
If you did not use plastic mulch, apply a heavy organic mulch around the plants after the soil has warmed. Even moisture is essential. Side-dressing with well-rotted manure about four weeks after transplanting is beneficial.
Most cucumbers are not self-pollinating and require bees for pollination. However, gynoecious (all female-flowering plants) and parthenocarpic (plants that do not require pollination to set fruit) varieties are available, and are recommended for cucumber crops grown in tunnels.
Cucumbers are vine fruits which will sprawl as they grow. For smaller spaces, trellising can be beneficial. Not only does training the vines to grow vertically on a support system save space, it also increases air flow in the garden — which may help reduce disease pressure.
Common Problems
The striped cucumber beetle can be a major pest for cucumbers and other cucurbits. Not only does it destroy leaves and sometimes fruit, but it also carries an incurable disease called bacterial wilt. Large transplants are much more tolerant than tiny seedlings germinating in the garden. Covering a plant with a polyester row cover is a good solution, but be sure to remove the row cover once the plants flower so that bees can pollinate the flowers. Pyrethrum applied once a week offers some control in serious infestations. Growing robust plants in healthy soil seems to help minimize cucumber beetle damage.
Harvest
Cucumbers should be harvested when small because they lose flavor and the texture is less desirable when large. Harvest daily since ripening fruit draws energy from the plant at the expense of other, developing fruit.
Yield per 50-foot row: 45 pounds
Melons
Soil Preparation
Melons do best in well-drained soil that is high in humus — soil preparation is similar to cucumbers.
Propagation
Melons — including muskmelons (cantaloupes), honeydews and watermelons — are a warm-season crop that do poorly during cool summers. They should be started indoors four weeks before the last spring frost. Melon seedlings will need to be handled carefully when transplanted into the garden — for this reason, many gardeners choose to plant them in peat pots so the roots will be minimally disturbed. You can also use half-gallon milk cartons, as described in this article.
Space hills (a cluster of 3 plants) 3 to 5 feet apart. Melons do well in warm soil, so black plastic mulch is often used. Put the plastic on the soil a week or two before planting to help warm the soil. Row covers can also be added at time of transplant for extra warmth as well as insect protection.
Culture
If you did not use plastic mulch, apply a heavy organic mulch around the plants after the soil has warmed. Even moisture is essential. Side-dressing with well-rotted manure about four weeks after transplanting is beneficial.
If using row covers, they will need to be removed at flowering to ensure insect pollination.
Common Problems
See “Cucumbers” for common problems.
Harvest
Melons can be tricky to harvest. Familiarize yourself with the varieties you planted so you know what to look for.
Most varieties offer several cues of ripeness. For cantaloupes, these signs may include the presence of netting on the rind, a perfume aroma from the blossom end, a color shift, and a slight crack appearing at the base of the stem attachment. Some varieties will “slip” off the vine when ripe — this is the ideal time to harvest. Watermelons have different telltale signs: The bottom of the fruit will turn yellowish where it touches the ground when approaching full ripeness. A watermelon will also sound hollow sound when thumped with your knuckles.
Yield per 50-foot row: 40 pounds of muskmelons
Summer Squash and Zucchini
Soil Preparation
See “Cucumbers” for soil preparation information.
Propagation
Main season summer squash and zucchini are generally direct-seeded outdoors, though a round of transplants can be started indoors four weeks before the last frost for a jump on the season. Some gardeners transplant their vine crop seedlings and direct seed more on the same day to ensure a longer harvest season. Space hills (clusters of three to five plants) 3 to 5 feet apart.
If direct seeding, wait until soil reaches 60 to 65 degrees Fahrenheit. Squash and zucchini benefit from warm soil and even moisture and do well planted through black plastic. Put the plastic on the soil a week or two before planting to help warm the soil. Row covers can also be added at time of transplant for extra warmth as well as insect protection.
Culture
If you did not use plastic mulch, apply a heavy organic mulch around the plants after the soil has warmed. Even moisture is essential. Side-dressing with well-rotted manure about four weeks after transplanting is beneficial. If using row cover, remove at flowering; cucurbits are not self-pollinating and require bees for pollination.
Common Problems
See “Cucumbers” for common problems.
Harvest
Summer squash and zucchini should be harvested when small because they lose flavor and the texture is less desirable when large. Harvest daily, since ripening fruit draws energy from the plant at the expense of other, developing fruit.
Yield per 50-foot row: 60 pounds
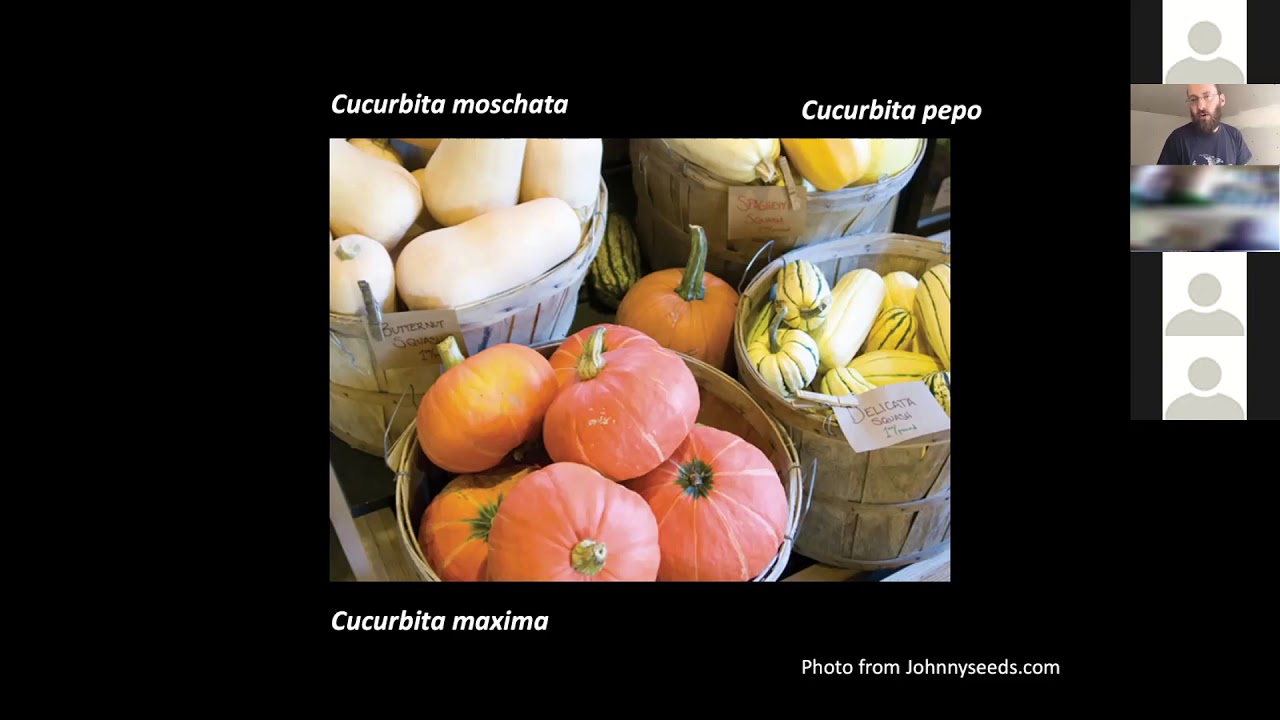
Winter Squash and Pumpkins
Soil Preparation
See “Cucumbers” for soil preparation information.
Propagation
When sowing seeds, use cells that are 2 inches in diameter, minimum, and use a soilless mix that is on the dry side. Place sown flats in a warm place (80 to 95 degrees Fahrenheit) for germination. About three weeks after seeds are sown, they’re ready to be transplanted to the field. Space 12 inches apart in rows 6 feet apart for compact varieties and 12 feet apart for larger fruits.
You can also direct seed squash, but seeds will not germinate in cool soil — wait until it reaches 60 to 65 degrees Fahrenheit. Since winter squash and pumpkins require a long growing season, seeds should be sown as soon as possible after the soil warms. If using black plastic, put the plastic on the soil a week or two before planting to help warm the soil. Row covers can also be added at time of transplant for extra warmth as well as insect protection.
Culture
If you did not use plastic mulch, apply a heavy organic mulch around the plants after the soil has warmed. Even moisture is essential. Side-dressing with well-rotted manure about four weeks after transplanting is beneficial. Remove row cover, if using, at time of flowering; cucurbits are not self-pollinating and require bees for pollination.
Common Problems
See “Cucumbers” for common problems.
Harvest
Winter squash should be allowed to mature to the point where the skin resists puncture by your fingernail. You can cure squash in the field for five to seven days, covering it at night if frost threatens; or you can cure it in a ventilated greenhouse at 80 to 90 degrees Fahrenheit for three to five days. Curing eliminates some of the moisture in the skin and toughens the skin. After curing, store winter squash at room temperature in a dry place.
Yield per 50-foot row: 80 pounds
Carrots
Soil Preparation
Light, moderately fertile soil with good water-holding capacity is best for root crops. Never add fresh manure, since excess soil nitrogen will promote hairy roots. The pH should be 6.5, and the soil should have plenty of potassium, so wood ashes are often appropriate. Dig the soil deeply and remove small rocks, since they will impede growth and lead to misshapen roots.
Propagation
Carrots germinate slowly, and the soil must be kept moist during germination. Some gardeners sow quickly-germinating radishes in with carrots in order to mark the rows before the carrots germinate.
Carrots can be sown from early spring through mid-summer for a consistent crop. Choose storage varieties for fall harvest. Make a furrow in soil and sprinkle seed about 1 inch apart in a 2-inch band in rows spaced 16 to 24 inches apart; thin carrots to 1 to 2 inches (the width of your thumb is a handy measurement).
Culture
Weeding is essential. Carrots are slow to get started and are easily out-competed by weeds. Water during dry spells.
Common Problems
The larva of the carrot rust fly is a maggot that tunnels into carrots. The tunnels can be seen on the surface of the carrot and are rusty in color due to the maggot’s excrement — hence the name of the pest. Larvae feeding during the summer cause stunted plants that turn yellow, and larger larvae destroy the crop. Larvae in fall carrots may be small when the crop is harvested for storage and may go unnoticed, but they continue to develop into large larvae during storage. Controls for carrot rust fly are all cultural modifications. If feasible, rid the growing area of all hosts the year before growing carrots, and, in any fields that had hosts, plow deeply in the fall to bury overwintering pupae. Planting later than the end of May will avoid the first generation of egg-laying flies. Harvesting an early planting by mid-June will get carrots out before the larvae enter the taproot or grow large enough to be noticed. Covering the planting with floating row cover is the best control — especially if you have had repeated problems with the pest and know that it overwinters regularly in your area.
Harvest
Harvest when the roots are large enough to eat, since old roots lose their flavor and crack. Carrots can also be kept and harvested throughout the winter under a thick mulch of hay, but rodents may become a problem.
Yields per 50-foot row: 45 pounds
Parsnips
Soil Preparation
Light, moderately fertile soil with good water-holding capacity is best for root crops. Never add fresh manure, since excess soil nitrogen will promote hairy roots. The pH should be 6.5, and the soil should have plenty of potassium, so wood ashes are often appropriate. Dig the soil deeply and remove small rocks, since they will impede growth and lead to misshapen roots.
Propagation
Parsnips germinate slowly, and the soil must be kept moist during germination. Some gardeners sow quickly-germinating radishes in with parsnips in order to mark the rows before the parsnips germinate.
Parsnips require a long season and should be sown directly in the garden in early to mid-spring. Sow seeds 1 inch apart in rows 18 to 24 inches apart; thin to 2 to 3 inches after emergence.
Culture
Weeding is critical. Parsnips are slow to get started and are easily out-competed by weeds. Water during dry spells.
Parsnip foliage can cause a severe rash which may develop into blisters. As a precautionary measure, wear long sleeves/pants and gloves when working with parsnips on sunny days and wash skin immediately after contact.
Harvest
Harvest when the roots are large enough to eat, since old roots lose their flavor and crack. Parsnip flavor is enhanced by frost, and some say the best crop is harvested the spring following the planting year. A thick mulch of hay will protect the roots, and they can be pulled through the snow until the ground freezes. Digging them in the spring is a common tradition.
Yields per 50-foot row: 50 pounds
Beets
Soil Preparation
Light, moderately fertile soil with good water-holding capacity is best for root crops. Never add fresh manure, since excess soil nitrogen will promote hairy roots. The pH should be 6.5, and the soil should have plenty of potassium, so wood ashes are often appropriate. Dig the soil deeply and remove small rocks, since they will impede growth and lead to misshapen roots.
Propagation
Beets can be sown every 2 to 3 weeks throughout the growing season, starting in early spring, for a continuous supply. For roots, sow seeds in a furrow in the garden, about 1 per inch, and thin to one plant per 2 inches. Seeds can be sown more densely for beets greens and thinned to the same spacing for root production. Some growers also start beets in flats and transplant them into the garden.
Culture
Keep beets well weeded and evenly watered.
Harvest
Harvest when the roots are large enough to eat, since old roots lose their flavor and crack.
Yield per 50-foot row: 35 pounds
Radishes
Soil Preparation
Light, moderately fertile soil with good water-holding capacity is best for root crops. Never add fresh manure, since excess soil nitrogen will promote hairy roots. The pH should be 6.5, and the soil should have plenty of potassium, so wood ashes are often appropriate. Dig the soil deeply and remove small rocks, since they will impede growth and lead to misshapen roots.
Propagation
Radishes germinate very quickly and mature in three to six weeks depending on variety. Sow salad types every 2 to 3 weeks, starting in early spring, for continued harvest. Winter/storage radishes, such as daikon and watermelon radishes, are best planted in the late summer and early fall.
Direct sow in garden furrows at a rate of 1 seed every inch in rows 1 foot apart.
Culture
Thin radishes to desired spacing based on varietal requirements. Keep weeded. Water during dry spells.
Common Problems
Flea beetles can damage the foliage, and may reduce yields if pest pressure is great. To reduce and delay flea beetle invasion of spring crops, move them as far away as possible from the fields that were previously used for Brassica crops. Flea beetles overwinter in field borders near last year’s crop. Planting the same crop close by to where it was last year ensures a high population in the spring. The same could be true if you have fields full of mustard weeds, or move to a field that was seeded to a Brassica cover crop the previous year. One of the best ways to protect Brassica crops from flea beetles is to place a floating row cover, or exclusion netting, over the bed or row. It is critical to seal the edges immediately after seeding or transplanting, because Brassica seeds germinate quickly and beetles rapidly find the cotyledons. Flea beetles can fit through extremely tiny cracks. Edges of the cover must be sealed on all sides using soil, plastic bags filled with soil, or some other method.
Harvest
Harvest the roots promptly when they are large enough to eat to avoid pithiness.
Yield per 50-foot row: 40 dozen
Turnips and Rutabagas
Soil Preparation
Neither turnips or rutabagas require high levels of fertility. They do well in loose, humus-rich, well-drained loam with a pH between 5.5 and 7.0; heavy clay soils can cause root branching. Turn manure into the planting area the previous fall, or add well-rotted manure or compost in the spring.
Phosphorous concentrations need to be adequate for root growth, and like other root crops, turnips and rutabagas need trace amounts of boron. If needed, you can amend your soil with a good compost or add a small amount of agricultural borax or soil amendment containing boron.
Propagation
Rutabagas and turnips have similar planting needs. Turnips can be planted as a spring or fall crop, and salad varieties can be sown every two to three weeks throughout the season. Sow spring crops as soon as the ground can be worked; sow fall crops in midsummer.
Rutabagas need at least 90 days to mature, and seeds should be sown at least three months before fall frost and harvest.
Sow seeds 1/4 to 1/2 inch deep in a row or bed, spacing seeds about 1 inch apart. If the soil is dry, flood the furrows before seeding. Rows should be 15 inches apart for turnips and 18 inches apart for rutabagas.
Culture
The seed will germinate in three to seven days. Once plants are 4 to 6 inches high, thin them to 6 to 8 inches apart to ensure ample room for root development. Salad turnips need only be thinned to 2 inches or so.
Keep weeded.
Common Problems
In Maine, planting rutabagas in mid-June may help to avoid the early flea beetles. See “Radishes” for more information on this pest.
Harvest
Harvest when the roots are large enough to eat. Turnips mature more quickly than rutabagas, but do not store as well. Turnips make a great summer crop — and will provide ample fresh greens in addition to roots. Rutabagas store well in the root cellar and will keep into late spring.
Sweet Corn
Soil Preparation
Sweet corn is a very heavy feeder and requires full sunlight. Fertilize the soil before planting, because once stunted, corn rarely recovers. Work a 2-inch-deep layer of well-rotted manure, 5 pounds per 100 square feet of phosphate rock phosphate and 5 pounds per 100 square feet of greensand into the soil. Soil tests will indicate if less rock powder is needed in future years. A pH of 6.0 to 6.8 is recommended.
Propagation
Corn is most often planted directly in the garden, 6 inches apart in rows that are 3 feet apart. Thin plants to 12 to 15 inches apart. A supply of fresh corn can be obtained by following this schedule: Plant an early variety and midseason variety about two weeks before the last frost; when the early variety has produced four leaves, sow another planting of the midseason variety plus a late season variety; one week later plant some more late-season corn. For an extra-early harvest, some people also start corn seedlings indoors about two weeks ahead of time and transplant those seedlings at the same time that they direct seed their first crop.
Corn is wind pollinated, and pollen released from the tassel must land on every strand of silk in order to pollinate every kernel in the ear and avoid “skips.” So corn is best planted in blocks of at least four rows to ensure good pollination.
Culture
Corn is a heavy feeder, so prepare a fertile soil as noted under “Soil Preparation.” Sidedress with some manure when plants are 5 to 6 inches tall. Early weeding is essential. Hilling soil around the base of plants will keep down weeds and offer additional support. After the tassels are produced, corn needs 1 inch of water per week. Do not remove suckers (side stalks growing out from the base of plants), as this may injure the plants.
Common Problems
Corn earworms and the European corn borer are the most common pests during the midsummer. The earworm does not overwinter in Maine, but adults migrate from the South by midsummer. The female moth lays eggs on the silk, and the larvae work their way to the tip of the ear and devour the kernels. Corn varieties with tight husks are more resistant. A few drops of mineral oil squirted into the ear through the silk channel may suffocate the worm. Bacillus thuringiensis (Bt) squirted in the channel may work, especially with the oil. At harvest, gardeners can also simply break off the tips of ears of corn that have earworms.
The borer overwinters in debris from the previous year’s corn, especially the lower end of the stalk. Destroying the stalks, fall plowing, a cold winter or early spring plowing will reduce populations. Early signs of damage appear as shot holes in the young leaves as they unfold out of the whorl where the caterpillar is feeding. As the caterpillar grows it will bore into the stalk and you can find holes where it enters or broken tassels where the stalk is weakened. Bt will work on the young larvae if you can get it down into the whorl at the right time. A granular Bt product is on the market, but the best controls are crop rotation and destroying last year’s stalks, unless you are surrounded by other fields of corn.
Harvest
Harvest about three weeks after silks emerge at the milk stage — when pierced kernels exude a white liquid — and when the tip of the ear feels full. Sweet corn is best harvested early in the morning, when temperatures are cool and moisture is high.
Peak quality occurs right after picking. Some gardeners say to get the water boiling before you walk out to the garden to harvest the corn. Many newer varieties of sweet corn hold their sweetness longer than older varieties.
Yield per 50-foot row: 5 dozen ears
Sweet Potatoes
Soil Preparation
Sweet potatoes are adaptable and will grow in poor soils, but yield far more in a well-drained, slightly acid, fertile loam. Heavy clay impedes root growth, so lighten heavy soils with organic matter.
Prepare a raised bed that is at least 15 inches wide by turning in a 6-inch layer of compost. You can turn in manure or green manure in the fall. Avoid heavy applications of nitrogen, as well as fresh manure — which may blacken sweet potato skin.
Propagation
Choose a variety that is suited to be grown in the North, such as Georgia Jet or Beauregard. Order slips — rooted sections of the sweet potato vine that are about 1 foot long — from a supplier or you can try to propagate your own.
Once the soil is at least 65 degrees Fahrenheit, transplant your sweet potato slips 15 inches apart in the prepared beds. Plastic mulch can be used to warm the soil ahead of time.
Culture
You can cover the beds with row cover for increased heat (the more 100-degree days, the better the yield); plants should not be exposed to temperatures below 50 to 55 degrees Fahrenheit.
Make sure the plants do not go more than a week without water. Ideally, you should provide each plant with 1 gallon of warm water when the soil is dry.
Harvest
Sweet potatoes continue growing larger until the soil cools to 50 degrees or below. If grown under row covers, your soil should cool by mid- to late September. Harvest sweet potatoes carefully to avoid bruising. Cure sweet potatoes by spreading them in a very warm place — 85 to 90 degrees — for one week, or at 75 to 85 degrees for two weeks. Once cured, sweet potatoes should be stored at 55 degrees.
Long-term care
Weed control and soil care
Weeds can be the gardener’s worst enemy. They compete for moisture and nutrients, offer a home for insects, harbor diseases and block the sun. Weeds can be controlled by hand weeding, cultivation and mulches. Most gardeners use a combination of all three. Shallow cultivation is less injurious to crop roots than deep cultivation and is just as effective. Hoe 1/2 to 1 inch deep; that’s all.
Controlling weeds

Mulch is material laid on the ground in order to shade out weeds and conserve moisture. Mulches may be either organic or inorganic. Organic mulches are especially desirable because they can be turned under in the fall or following spring and will add organic matter to the soil. Organic mulches are best applied after the soil has become warm and shortly after a heavy rain. Straw, old hay (watch for weed seeds!), grass clippings, leaves, wood chips, ramial chips, newspaper and sawdust are common organic mulches.
Cultivate before piling on the mulch, and pile it on thick enough (3 to 6 inches for hay, for example; or six sheets of newspaper covered with a few inches of hay to hold it down) to prevent the weeds from growing through.
Black plastic is very good at controlling weeds, conserving moisture and warming the soil. However, it does not decompose and needs to be picked up every fall. Because it warms the soil, black plastic frequently increases the yield of warm-season crops such as melons, peppers, eggplants and tomatoes. It is easier to lay the plastic before planting and plant through it than to lay it around plants. Lay the plastic and secure the edges with soil.
It is important to note that plastic is a nonrenewable resource and is a source of environmental pollution. It should not be an organic gardener’s first choice of mulch. Biodegradable plastic mulches made from cornstarch are available but are not approved for use in commercial organic production.
Extending your crop season
Two common methods can help get you a little more out of the short growing season in Maine: 1) start plants indoors and 2) grow plants under protective cover outdoors during the colder months.
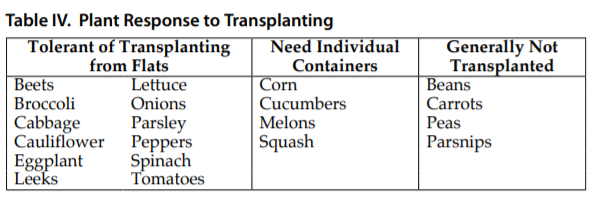
Certain vegetables don’t really suffer from transplanting and you can start them indoors in large flats, while others are quite sensitive and should be planted in individual containers in order to reduce root disturbance when you transplant them. Many kinds of plants cannot withstand the stress of transplanting and should only be started directly from seed in the garden. (See Table IV.)
Tips for extending your season
Extending the growing season with plant covers is very common in Maine. Hotcaps, empty plastic milk containers with their bottoms cut off and top left off, plastic row covers on wire hoops, and polyester cloth row covers laid loosely over plants give a few degrees of frost protection and provide warmer conditions in the spring (especially the plastic). In addition, polyester cloth excludes harmful insects and is especially useful on the cole crops, onions and cucurbits. For additional warmth, these season extenders can be used over black plastic mulch. All of these materials should allow air exchange to avoid overheating, so leave the caps off the milk containers and use slitted plastic row covers.
Plant successions for continued harvests
Succession planting is another way to extend the season of individual crops. You can make frequent plantings (every week or so) of quick-maturing crops — like lettuce, mesclun, radishes or salad turnips — to ensure a steady harvest over a longer period.
More resources
Now that you know how to plant your very own vegetable garden, take a look below at our resources for further reading and viewing.
Fruit and vegetable fact sheets
Latest crop resources

Video resources


Ask an organic specialist
Still have more questions about growing crops? Our specialists at MOFGA are available to answer any questions.
- Ask Caleb Goossen questions about vegetables, small fruits, flowers, soils, pests, or growing questions in general. Caleb produces MOFGA's Pest Reports during the growing season.
- Sign up for our monthly email newsletter for gardeners.
Upcoming Gardening Events
Farm & Homestead Day 2025
June 21 @ 9:00 am - 3:30 pmGrow Your Own Apothecary: In-Person
June 26 @ 4:30 pm - 7:00 pmGather & Grow Tour: Growing a School Garden
July 10 @ 6:00 pm - 7:00 pmGather & Grow Tour: Orono Community Giving Garden
July 14 @ 6:00 pm - 7:00 pmLunch-and-Discuss with Jessica J. Lee
July 24 @ 12:00 pm - 1:30 pm